Creating the Iris
This Iris painting is still not complete, but lets go through all the steps that have gotten me to this point. I should have this done within a week. But working on many different things in the studio.

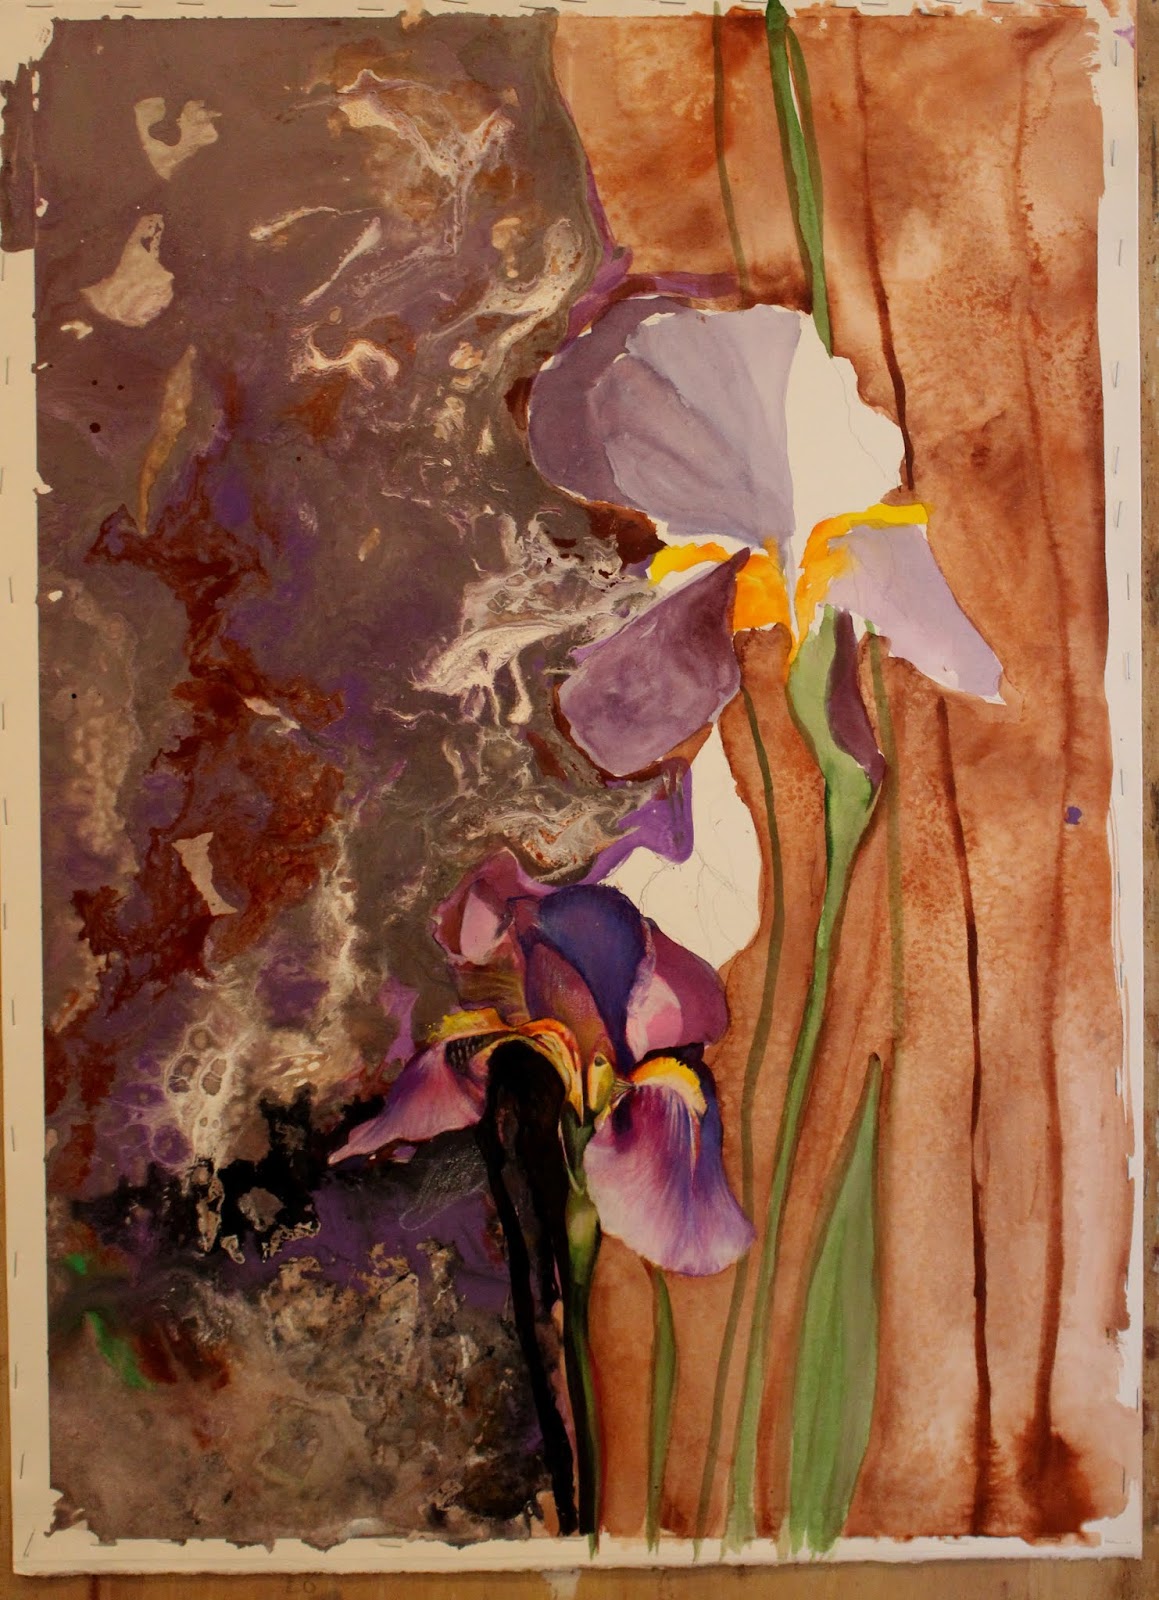
This is a detail of where I am at with the Iris painting/mixed media as I entered the studio this morning.
Now I'll start from the beginning of this piece. First just in seeing the beautiful Iris blooms and clusters of Iris flowers, I had to take a couple working photographs.

First, as always, I stretch my archival paper in a bath of water and staple to a board to dry. When the paper is dry I can begin work. Sometimes the wait is horrible, because I want to get started. But I always have several things, if not more, that I am working on.
I drew out two main blossoms and a bud. I painted a mix of bronze, white green and violet and let those colors move along the left hand side of the flower grouping to create their edge.
You can see my light pencil line line work. I usually use a 2h pencil to do my drawings for pieces, it will not give me a dark line.

Here you can see how much of the paper has been covered by the first paint layer. I placed blue tape over my staples only because I wanted a white edge on this piece. That would go under the matting anyway. But it helps to view the piece from all the clutter in the studio if I have a white edge, a border or closure edge.

Now I added watercolor to compliment the other side and reveal the Iris. Pulling out some of the rust colors from the left side.

The rust watercolor doesn't look as strong in this photo, just a lighting issue. Started to wash in the iris with watercolor. And removed the blue tape.

Now working the lower flower more with pencil and paint, not sure of the black yet.

I've added some paper collage to the lower left, painted over the black that I wasn't married too, added more bronze acrylic paint. Then decided to play on the vertical lines and make them black and create a bronze repetitious pattern onto the black. I liked how that looked and wanted to create a good balance with that black/bronze technique. I also created some other areas of small collage patterns for composition carry through.

Same image, but cropping out the white border. This is the best way to see how a piece is working. Photograph it and crop everything but what you want in the piece. This will show you the immediate plus and minuses of the developing art.

Here is where I am at today. I decided to add white lengths of gesso and texture it as I do in so many of my pieces. I have my favorite stamps. Now that this is dry I will watercolor over this and the texture stamps will reveal. Plus I started work on the upper flower and I have lightened some of the petals with additional white paint.

This is the close up of what I began this blog with. Texture and realism coming together. Again, hope to have this done today, but I had a few commissions to complete, a show of abstracts to work on and I was doing lots of stoneware!!!
Contact with any interest or questions. I'm happy to answer. nancybossert@gmail.com
Follow me on intagram: bossertnancy All work on my instagram site is my work.
So Enjoy and get inspired to create, there are no mistakes in art, only opportunities.
Still working on this mixed media painting.
The white area I gessoed and textured, waited for it to dry and then painted a acrylic wash of yellow ocher and raw sienna over it. The result below.

I wanted to create another area of texture and pattern. I did wash this same color mix over additional parts of the entire piece. This will create an overall harmony. Now I need to complete the blossoms, stems and many other tweaking over the piece.
While I am working on this, I had two commissions to create, plus working on a exhibition for winter 2018. Always enjoying
Creating some interesting clay pieces, I'll give you a peek, I am incorporating deer antler with this new series of stoneware! :)


This is a detail of where I am at with the Iris painting/mixed media as I entered the studio this morning.
Now I'll start from the beginning of this piece. First just in seeing the beautiful Iris blooms and clusters of Iris flowers, I had to take a couple working photographs.

First, as always, I stretch my archival paper in a bath of water and staple to a board to dry. When the paper is dry I can begin work. Sometimes the wait is horrible, because I want to get started. But I always have several things, if not more, that I am working on.
I drew out two main blossoms and a bud. I painted a mix of bronze, white green and violet and let those colors move along the left hand side of the flower grouping to create their edge.
You can see my light pencil line line work. I usually use a 2h pencil to do my drawings for pieces, it will not give me a dark line.

Here you can see how much of the paper has been covered by the first paint layer. I placed blue tape over my staples only because I wanted a white edge on this piece. That would go under the matting anyway. But it helps to view the piece from all the clutter in the studio if I have a white edge, a border or closure edge.

Now I added watercolor to compliment the other side and reveal the Iris. Pulling out some of the rust colors from the left side.

The rust watercolor doesn't look as strong in this photo, just a lighting issue. Started to wash in the iris with watercolor. And removed the blue tape.
Now working the lower flower more with pencil and paint, not sure of the black yet.

I've added some paper collage to the lower left, painted over the black that I wasn't married too, added more bronze acrylic paint. Then decided to play on the vertical lines and make them black and create a bronze repetitious pattern onto the black. I liked how that looked and wanted to create a good balance with that black/bronze technique. I also created some other areas of small collage patterns for composition carry through.

Same image, but cropping out the white border. This is the best way to see how a piece is working. Photograph it and crop everything but what you want in the piece. This will show you the immediate plus and minuses of the developing art.

Here is where I am at today. I decided to add white lengths of gesso and texture it as I do in so many of my pieces. I have my favorite stamps. Now that this is dry I will watercolor over this and the texture stamps will reveal. Plus I started work on the upper flower and I have lightened some of the petals with additional white paint.

This is the close up of what I began this blog with. Texture and realism coming together. Again, hope to have this done today, but I had a few commissions to complete, a show of abstracts to work on and I was doing lots of stoneware!!!
Contact with any interest or questions. I'm happy to answer. nancybossert@gmail.com
Follow me on intagram: bossertnancy All work on my instagram site is my work.
So Enjoy and get inspired to create, there are no mistakes in art, only opportunities.
Still working on this mixed media painting.
The white area I gessoed and textured, waited for it to dry and then painted a acrylic wash of yellow ocher and raw sienna over it. The result below.

While I am working on this, I had two commissions to create, plus working on a exhibition for winter 2018. Always enjoying
Creating some interesting clay pieces, I'll give you a peek, I am incorporating deer antler with this new series of stoneware! :)


Comments
Post a Comment